[ANN] VS Code extension v0.15 released - with debugger

We just released the first build from the v0.15 series of the VS Code Julia extension to the marketplace. The main new feature in this release is an experimental debugger. The rest of this post will describe what debugging features we support.

Before I do that, I need to stress though that this really is at best an experimental version of the debugger. Sometimes it works great, but sometimes it doesn’t. Often it is too slow to be very useful. There are situations when it doesn’t really do what you want it to do. I do encourage you to try it out, but at this point the experience is not comparable to the smooth debugging experience that you get for other languages in VS Code.

With these caveats out of the way, here is what we do have. I’ll structure this post as a walk through example, followed by descriptions of some specific features. As such it won’t be complete, but you can get a lot more tips and ideas on how to use the debugger by reading through the debugger documentation for VS Code itself.

Example

Lets assume you have a simple project with one Julia file open in VS Code:

First you should click on the button for the Run view. You will now see the default debugger start panel:

If you just click on Run and Debug (or press F5), the current active Julia file will run in the debugger. Output will be shown in a special Julia Debug terminal:

In this example the whole program ran through in one go and finished without any problem. Lets make this example a bit more useful by setting a breakpoint on line 11. We do this by simple clicking with the mouse in the left most column of the code editor:

The red dot shows us that we have now set a breakpoint. Next we start the program again (either by clicking on Run and Debug or pressing F5). When the program reaches line 11, it will now pause:

The yellow line shows us the location that we will execute next if we continue to run the program. We can also see where we are in the call stack and a list of all breakpoints. At the top of the text editor we now see a toolbar with commands for common debug actions: Continue, Step over, Step Into, Step Out etc. Lets click once on Step Over and then Step Into. We are now paused on the first line of the bar function:

The Variables view now shows us what local variables we have in this function and what their current values are. As we step through the program, and eventually reach the end of the bar function, the list of local variables gets longer, i.e. we now also see the values for c and d:

Let us set another breakpoint on line 15 and then continue the program until it hits that breakpoint. Then we click on Debug Console and see a view like this:

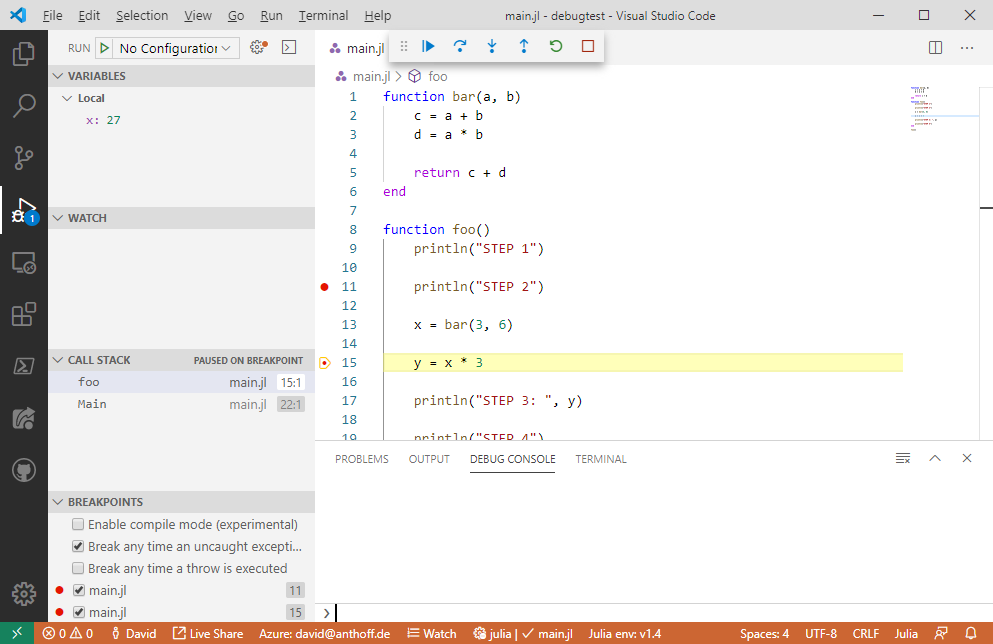
In this view we can evaluate arbitrary Julia code in the context of the current function. For example, we can compute the log of x by running log(x) here:

We can also change the value of any local variable while the program is paused. For example, to change the value of x, we can double click in the Variables section on the value 27 next to x and then enter any arbitrary Julia expression. The value this expression returns will become the new value for the variable x. In the following example I changed the value of x to a string:

This concludes the very basic walk through. I’ll now want to highlight some other features.

Ways to start the debugger

There are two basic ways to start the debugger. The first you already learned in the walk through: you run a Julia file in the debugger. The second allows you to debug code in the interactive REPL.

Running Julia files

In our example we started the currently active Julia file in the debugger. This is the most basic way to start debugging, but there are many more options that you can configure in a VS Code launch.json file. Examples include setting a fixed Julia file as the startup file, configuring command line arguments etc. The launch.json functionality is described in more detail in the VS Code debugger documentation.

Debugging code from the REPL

You can also start the debugger from the REPL. In that situation the debugger will attach to the already running REPL. To start such a debug session you use two macros in the REPL: the @enter and @run macro. Both are very simple: they will start the debugger on the code that was passed to the macro. The @run macro will run the code until a breakpoint is hit, while the @enter macro will pause the debugger on the first line of the code. For example, you can start debugging the println function from the REPL by entering @enter println("Test").

Breakpoints

You already learned how you can easily set breakpoints in the source code itself. There are two more options for breakpoints: function breakpoints and condition on breakpoints.

Function breakpoints

If you click on the little + sign in the BREKPOINTS view, you can add a function breakpoint. Simply enter the name of the function you want to break on. You can also configure it to only break on specific methods by specifying a signature a la foo(::String, ::Number).

Breakpoint conditions

If you click with the right mouse onto a breakpoint in the editor, you can select an option Edit breakpoint..., and then you can add a condition on the breakpoint. You can enter any valid Julia expression that returns a Bool value here. You have of course full access to all local variables in this expression.

Variables viewer

Composite variables, arrays and dictionaries have full tree drill down support in the variables viewer:

image

Watch section

The watch section allows you to enter arbitrary Julia expressions that are evaluated whenever the program pauses and the result is shown:

image

Call stack

The call stack section allows you to look at the content of any stack frame, i.e. when you click on a different function there it will show the local variables for the selected stack frame. You can also restart code execution at any stack frame by clicking the small restart icon next to a given entry here:

image

Note that this last feature can be quite brittle, in particular if your functions modify any global state.

Exceptions

If your code throws an exception, you get a nice exception view:

You can also configure the behavior of the debugger in the face of exceptions in the BREAKPOINTS part of the UI.

Compile mode

The breakpoints view has another option called Enable compile mode:

image

The functionality of this option is the following: if you select this option, breakpoints that are set in any function that is called from the current stack frame will no longer pause code execution. In our example, if you have paused in function foo and then select this option, a breakpoint in bar would no longer pause execution. Breakpoints in foo would still pause the debugger. Why would you ever want to use this feature? Your code will run a lot faster with this option enabled.

Conclusion

We hope you find this new debugger UI useful! Please do let us know about any issues problems you encounter over at the GitHub - julia-vscode/julia-vscode: Julia extension for Visual Studio Code repository.

This feature is completely based on the awesome GitHub - JuliaDebug/JuliaInterpreter.jl: Interpreter for Julia code package. We really only provide a UI front end, the actual debugger functionality all comes from that package. Thanks @tim.holy and @kristoffer.carlsson!

83 Likes

Congratulations on this amazing feature! :partying_face:
VS Code is getting really competitive with Atom in terms of feature coverage. Now the only thing that is holding me back from giving VS Code a serious try is a workspace viewer. Are there plans to add it too? What’s the timeline on it?

Congrats on the addition of this ! VSCode is so smooth to use :).

I face the following error when I try to launch a specific debug command. A MWE

# File test.jl
function test(a);
 b = 2a + 1;
 return b;
end

and I set a breakpoint on l2 (b = 2a+1).
Then, in the Julia VS terminal I type

@enter test(12)

I get the following error

ERROR: IOError: connect: name too long (ENAMETOOLONG)
Stacktrace:
[1] wait_connected(::Base.PipeEndpoint) at /Users/sabae/buildbot/worker/package_macos64/build/usr/share/julia/stdlib/v1.3/Sockets/src/Sockets.jl:520
[2] connect at /Users/sabae/buildbot/worker/package_macos64/build/usr/share/julia/stdlib/v1.3/Sockets/src/Sockets.jl:555 [inlined]
[3] connect at /Users/sabae/buildbot/worker/package_macos64/build/usr/share/julia/stdlib/v1.3/Sockets/src/PipeServer.jl:97 [inlined]
[4] startdebug(::String) at /Users/gerzaguet/.vscode/extensions/julialang.language-julia-insider-0.15.17/scripts/debugger/debugger.jl:44
[5] (::Main._vscodeserver.var"#10#14"{Array{UInt8,1}})() at /Users/gerzaguet/.vscode/extensions/julialang.language-julia-insider-0.15.17/scripts/terminalserver/terminalserver.jl:177
[6] hideprompt(::Main._vscodeserver.var"#10#14"{Array{UInt8,1}}) at /Users/gerzaguet/.vscode/extensions/julialang.language-julia-insider-0.15.17/scripts/terminalserver/repl.jl:28
[7] macro expansion at /Users/gerzaguet/.vscode/extensions/julialang.language-julia-insider-0.15.17/scripts/terminalserver/terminalserver.jl:174 [inlined]
[8] (::Main._vscodeserver.var"#7#11")() at ./task.jl:333

Additionnal useful remarks

  • Same happens if I run @run test(12)
  • If I add test(12) in the file (after function definition) and then execute active file, no error occurs
  • I currently debug in a package environment, on macOS, with Julia 1.3

julia> versioninfo()
Julia Version 1.3.0
Commit 46ce4d7933 (2019-11-26 06:09 UTC)
Platform Info:
OS: macOS (x86_64-apple-darwin19.0.0)
CPU: Intel(R) Core™ i7-7567U CPU @ 3.50GHz
WORD_SIZE: 64
LIBM: libopenlibm
LLVM: libLLVM-6.0.1 (ORCJIT, skylake)
Environment:
JULIA_EDITOR = “/Applications/Visual Studio Code.app/Contents/Resources/app/bin/code”
JULIA_NUM_THREADS = 1

So can we use a @enter or a @run in an existing Julia session ? If so, any idea on what is wrong ?
Thanks

Very cool to see. I’m assuming this is based on the debug adapter protocol? Where does the code for this live? I’d love to poke through it.

Very nice! Looking forward to using this extensively.

I have one potentially stupid question: how can I run julia scripts from a julia file in REPL “the old way”, such that I can interactively work in the REPL when the script has finished?
For me (VSCode 1.43.1, Windows 10, Julia 1.4, Julia plugin 0.15.6), both, using “Start Debugging (F5)” and “Run Without Debugging (Ctrl+F5)” run the script in a “julia debugger”, none in a currently active “julia” REPL window.

Hence, every excecution now ends with output
Julia debuggee finished. Press ENTER to close this terminal.

The GUI is very convenient. You can create a launch.json file and configure how to start the program. The following is one of my launch.json file in /.vscode/. Every time you just press “F5” to start debugging on Windows system. The speed is improved a lot compared with the very earlier pre-release version. I using it for may daily work now.

{
    // Use IntelliSense to learn about possible attributes.
    // Hover to view descriptions of existing attributes.
    // For more information, visit: https://go.microsoft.com/fwlink/?linkid=830387
    "version": "0.2.0",
    "configurations": [
        {
            "type": "julia",
            "request": "launch",
            "name": "Run active Julia file",
            "program": "${workspaceFolder}/test/small_network.jl",   # the enter of the program
            "stopOnEntry": false,
            "cwd": "${workspaceFolder}",
            "juliaEnv": "${command:activeJuliaEnvironment}"    
        }
    ]
}
1 Like

https://github.com/julia-vscode/julia-vscode/pull/1003, no timeline.

Ah, thanks for the report, I think I know how to fix this. I’ll try to push a new build soon.

Right now we are using this hook, so not a direct implementation of the DAP. And then the VS Code extension communicates with the Julia process via a custom protocol over named pipes. That was the easiest way to implement it initially, but I plan to eventually replace the custom protocol with DAP itself. The debugging code in the extension is here, the Julia side of things is mostly here.

Ah, I should have mention that: this is the one breaking change with this update, F5 now starts the debugger and no longer runs the currently active file in the REPL. We didn’t configure a new keyboard shortcut for “Run File in REPL”, but the command still exists (language-julia.executeJuliaFileInREPL) and you should be able to configure your own keyboard shortcut for it. Tracking this here.

That is a really good point: there is a wealth of config options there! I think one can even configure it to start multiple things at the same time? I never tried it, but I think that actually works.

1 Like

I just pushed a new version v0.15.18 that should fix this!

4 Likes

Thank you. You are the best :+1:

Thank you very much @davidanthoff, It now perfetly works. :slight_smile:

1 Like

Dumb of me but I can’t find where to open a julia REPL from which I can run the debugger using the @run macro. I can only see the Terminal -> New terminal but that opens a power shell. But I don’t want power shells for nothing.

How can I access to the VS julia REPL?
Thanks

Use the Julia: Start REPL command.

1 Like

OK, thanks. But

ERROR: could not open file c:\Users\joaqu\.vscode\extensions\julialang.language-julia-0.15.16\scripts\terminalserver\terminalserver.jl
Stacktrace:
 [1] include(::Module, ::String) at .\Base.jl:377     
 [2] exec_options(::Base.JLOptions) at .\client.jl:288
 [3] _start() at .\client.jl:484

Trying to install 0.15.18 but it fails and tells me to download it manually, which I do but it’s still downloading 0.15.16

Hm, that is weird, that very much looks like something went wrong with the install of the extension… I don’t really understand how you can get an error message that involves 0.15.16 while it is still downloading that version? Maybe just uninstall all versions, restart VS Code and then install again from the marketplace?

No, I had installed 0.15.16 before (same story, failed automatic install, dwl manually and installed). Now I was trying to update to 0.15.18

Closed, VS, reopened, the julia extension had gone, reinstalled. Now 0.15.18 and the error above desapear. Seems all good.

1 Like

I can’t figure out how to see what call is next like in the old REPL debugger. Also, there doesn’t seem to be the “next call” (nc) command…

is it possible to go back to the REPL debugger when I type @enter?

We are constrained in terms of UI to what VS Code offers, so we don’t have those features.

Presumably Debugger.@enter etc. would work.

1 Like

amazing - trying it out now!

Should note somewhere that it needs to have the latest vscode 1.43+, i had 1.40 before and the latest version didn’t show up/refused to install when i downloaded it manually.

Just signed up to leave a THANK YOU!
This is much needed! I have so much trouble establishing a good debugging routine with julia.
So glad I found this, will try it out immediately! :smiley:

3 Likes